
Error Proofing
What is it?
Error proofing is a structured approach to ensuring quality all the way through your work processes. This approach enables you to improve your production or business processes to prevent specific errors—and, thus, defects—from occurring.
What does it do?
Error-proofing methods enable you to discover sources of errors through fact-based problem solving. The focus of error proofing is not on identifying and counting defects. Rather, it is on the elimination of their cause: one or more errors that occur somewhere in the production process. The distinction between an error and a defect is as follows:
- An error is any deviation from a specified manufacturing or business process. Errors cause defects in products or services.
- A defect is a part, product, or service that does not conform to specifications or a customer’s expectations. Defects are caused by errors.
The goal of error proofing is to create an error-free production environment. It prevents defects by eliminating their root cause, which is the best way to produce high-quality products and services.
Why use it?
For your organization to be competitive in the marketplace, you must deliver high-quality products and services that exceed your customers’ expectations. You cannot afford to produce defective products or services.
A lean enterprise strives for quality at the source. This means that any defects that occur during one operation in a manufacturing or business process should never be passed on to the next operation. This ensures that your customers will receive only defect-free products or services.
In a “fat” system, any defects that are found can simply be discarded while operations continue. These defects are later counted, and if their numbers are high enough, root-cause analysis (see Glossary) is done to prevent their recurrence. But in a lean enterprise, which concentrates on producing smaller batch sizes and producing to order versus adding to inventory, a single defect can significantly impact performance levels.
When a defect occurs in a lean enterprise, operations must stop while immediate action is taken to resolve the situation. Obviously, such pauses in operations can be costly if defects occur often. Therefore, it is important to prevent defects before they can occur.

What areas do I focus on?
Your organization can achieve zero errors by understanding and implementing the four elements of error proofing. These are as follows:
- General inspection.
- 100% inspection.
- Error-proofing devices.
- Immediate feedback.
Below is an in-depth look at each of these four elements.
Element #1: General inspection
The first, and most important, element of error proofing is inspection. There are three types of inspections that organizations commonly use.
- Source inspections. Source inspections detect errors in a manufacturing process before a defect in the final part or product occurs. The goal of source inspections is to prevent the occurrence of defects by preventing the occurrence of errors.
- In addition to catching errors, source inspections provide feedback to employees before further processing takes place. Source inspections are often the most challenging element of error proofing to design and implement.
- Judgment inspections. Often referred to as end-of the-line inspections, final inspections, or dock audits, these are inspections during which a quality inspector or operator compares a final product or part with a standard. If the product or part does not conform, it is rejected.
- This inspection method has two drawbacks. First, it might not prevent all defects from being shipped to customers. Second, it increases the delay between the time an error occurs and the time a resulting defect is discovered. This allows the production process to continue to make defective products and makes root-cause analysis difficult.
- Informative inspections. Informative inspections provide timely information about a defect so that root-cause analysis can be done and the production process can be adjusted before significant numbers of defects are created.
Typically, these inspections are done close enough to the time of the occurrence of the defect so that action can be taken to prevent further defects from occurring.
There are two types of informative inspections:
- Successive inspections. These inspections are performed after one operation in the production process is completed, by employees who perform the next operation in the process. Feedback can be provided as soon as any defects are detected (which is preferable) or simply tracked and reported later. It is always better to report defects immediately.
- Self-inspections. Operators perform self-inspections at their own workstations. If an operator finds a defect in a product or part, he/she sets it aside and takes action to ensure that other defective products or parts are not passed on to the next operation. The root cause of the defect is then determined and corrected. Often this involves putting error-proofing measures and devices in place to prevent the problem from recurring.
Element #2: 100% inspection
The second element of error proofing is 100% inspection, the most effective type of inspection. During these inspections, a comparison of actual parts or products to standards is done 100% of the time at the potential source of an error. The goal is to achieve 100% real-time inspection of the potential process errors that lead to defects.
It is often physically impossible and too time-consuming to conduct 100% inspection of all products or parts for defects. To help you achieve zero defects, use low-cost error-proofing devices to perform 100%inspection of known sources of error. When an error is found, you should halt the process or alert an operator before a defect can be produced.
Statistical process control (SPC) is the use of mathematics and statistical measurements to solve your organization’s problems and build quality into your products and services. When used to monitor product characteristics, SPC is an effective technique for diagnosing process-performance problems and gathering information for improving your production process.
But because SPC relies on product sampling to provide both product and process characteristics, it can detect only those errors that occur in the sample that you analyze. It gives a reliable estimate of the number of total defects that are occurring, but it cannot prevent defects from happening, nor does it identify all the defective products that exist before they reach your customers.
Element #3: Error-proofing devices
The third element of error proofing is the use of error-proofing devices: physical devices that enhance or substitute for the human senses and improve both the cost and reliability of your organization’s inspection activities.
You can use mechanical, electrical, pneumatic, or hydraulic devices to sense, signal, or prevent existing or potential error conditions and thus achieve 100%inspection of errors in a cost-effective manner.
Common error-proofing devices include the following:
- Guide pins of different sizes that physically capture or limit the movement of parts, tooling, or equipment during the production process.
- Limit switches, physical-contact sensors that show the presence and/or absence of products and machine components and their proper position.
- Counters, devices used to count the number of components, production of parts, and availability of components.
- Alarms that an operator activates when he/she detects an error.
- Checklists, which are written or graphical reminders of tasks, materials, events, and so on.
Such industrial sensing devices are the most versatile error-proofing tools available for work processes. Once such a device detects an unacceptable condition, it either warns the operator of the condition or automatically takes control of the function of the equipment, causing it to stop or correct itself. These warning and control steps, known as regulatory functions, are explained more below.
- These sensing devices can detect object characteristics by using both contact and non-contact methods. Contact sensors include micro-switches and limit switches; non-contact methods include transmitting and reflecting photoelectric switches.
Setting functions describe specific attributes that sensing devices need to inspect. All of the four setting functions listed below are effective error-detection methods:
- Contact methods involve inspecting for physical characteristics of an object, such as size, shape, or color, to determine if any abnormalities exist.
- Example: A sensor receives a reflective signal (sparks) only when the flint wheel is installed correctly.
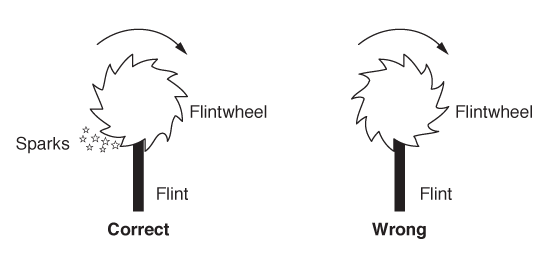
- Fixed-value setting functions inspect for a specific number of items, events, and so on, to determine if any abnormalities exist. This technique is often used to ensure that the right quantity of parts has been used or the correct number of activities has been performed.
- Example: All materials must be used to assemble a case, including eight screws. A counter on the drill keeps track of the number of screws used. Another method is to package screws in groups of eight.
- Motion-step setting functions inspect the sequence of actions to determine if they are done out of order.
- Example: Materials are loaded into a hopper in a predetermined sequence. If the scale does not indicate the correct weight for each incremental addition, a warning light comes on.
- Information-setting functions check the accuracy of information and its movement over time and distance to determine if any gaps or errors exist.
- Here are some tips for using information-setting functions:
- To capture information that will be needed later, use work logs, schedules, and action lists.
- To distribute information accurately across distances, you can use e-mail, bar-coding systems, radio frequency devices, voice messaging systems, and integrated information systems, such as enterprise resource planning (ERP) (see Glossary).
- Example: Inventory placed in a temporary storage location must be accurately entered into the storeroom system for later retrieval during the picking operation. Bar-coding is used to identify part numbers and bin locations. This data is transferred directly from the bar-code reader to the storeroom system. Customers access the storeroom system through the internet.
Element #4: Immediate feedback
The fourth element of error proofing is immediate feedback. Because time is of the essence in lean operations, giving immediate feedback to employees who can resolve errors before defects occur is vital to success.
The ideal response to an error is to stop production and eliminate the source of the error. But this is not always possible, especially in continuous batch or flow operations. (See chapter 8 for details.) You should determine the most cost-effective scenario for stopping production in your work process when an error is detected.
It is often better to use a sensor or other error-proofing device to improve feedback time rather than relying on human intervention.
Methods for providing immediate feedback that use sensing devices are called regulatory functions. When a sensing device detects an error, it either warns an operator of the condition or makes adjustments to correct the error.
There are two types of regulatory functions. The first, the warning method, does not stop operations but provides various forms of feedback for the operator to act upon. Common feedback methods include flashing lights or unusual sounds designed to capture an operator’s attention.
Example: A clogged meter sets off a warning light on a control panel. However, the operator can still run the mixer and produce bad powder.
The second type of regulatory function is called the control method. This method is preferred for responding to error conditions, especially where safety is a concern. However, it can also be a more frustrating method for the operator if a machine continually shuts itself down.
Example: A mixer will not operate until the water meter is repaired. The preventive maintenance program should have “meter visual inspections” on its schedule, and spare nozzles should be made available.
Warning methods are less effective than control methods because they rely on the operator’s ability to recognize and correct the situation. If the operator does not notice or react to the error quickly enough, defective parts or products will still be produced. However, warning methods are preferred over control methods when the automatic shutdown of a line or piece of equipment is very expensive.

What are some common sources of errors?
Common sources of error include humans, methods, measurements, materials, machines, and environmental conditions. These are examined in detail below.
Any one of these factors alone, or any combination of them, might be enough to cause errors, which can then lead to defects.
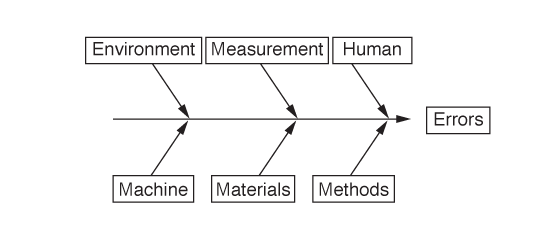
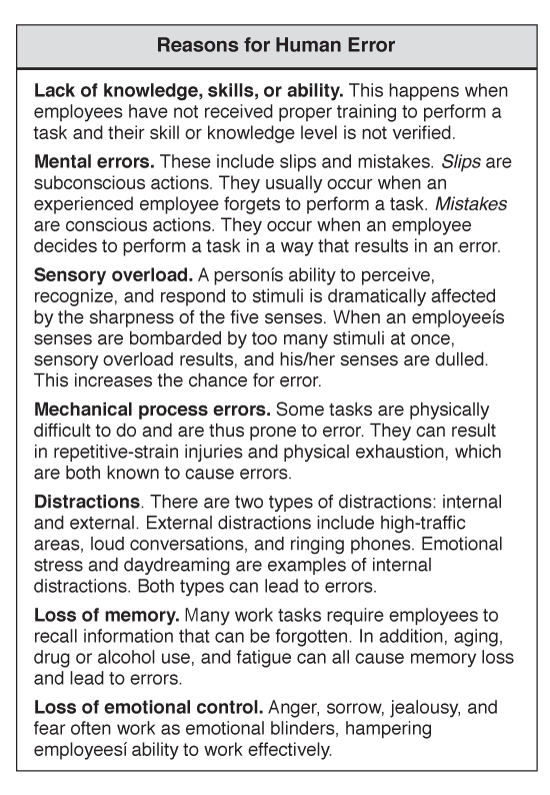
- Humans. Unfortunately, human error is an unavoidable reality. The reasons are many. See the chart below for a list of reasons.
- Measurements. Measurements must be accurate, repeatable, and reproducible if they are to successfully locate a problem. Unfortunately, measurement devices and methods are as equally prone to error as the processes and products that they measure.
- Inspection measurement practices, measurement graphs and reports, and measurement definitions are all potential sources of misinterpretation and disagreement. For instance, a measurement scale’s being out of calibration can cause errors.
- Methods. Industry experts believe that nearly 85% of the errors that occur in a work process are caused by the tasks and technology involved in the process. The sources of error in a work process are as follows:
- Process steps. These are the physical or mental steps that convert raw materials into products, parts, or services.
- Transportation. This refers to the movement of materials, information, people, and technology during a work process.
- Decision making. This is the process of making a choice among alternatives. Make sure that all your employees’ decisions address six basic questions: Who? What? When? Where? How? Why?
- Inspections. These are activities that compare the actual to the expected. As noted above, they are prone to error.
- Materials. This factor can contribute to error in the following ways:
- Use of the wrong type or amount of raw materials or use of incompatible raw materials, components, or finished products.
- Inherent product, tool, or equipment designs. A root-cause analysis typically leads back to faulty manufacturing, materials handling, or packaging practices.
- Missing or ill-designed administrative tools (e.g., forms, documents, and office supplies) that do not support performance requirements.
- Machines. Machine errors are classified as either predictable or unpredictable. Predictable errors are usually addressed in a preventative or scheduled maintenance plan (see Glossary). Unpredictable errors, which are caused by varying machine reliability, should be considered when your organization purchases equipment. If satisfactory machine reliability cannot be achieved, then you must plan other ways to prevent and catch machine-related errors.
- Environmental conditions. Poor lighting, excessive heat or cold, and high noise levels all have a dramatic affect on human attention levels, energy levels, and reasoning ability.
In addition, unseen organizational influences—such as pressure to get a product shipped, internal competition among employees, and pressure to achieve higher wage levels—all affect quality and productivity.

How do I error-proof “red-flag” conditions?
The probability that errors will happen is high in certain types of situations. These so-called red-flag conditions include the following:
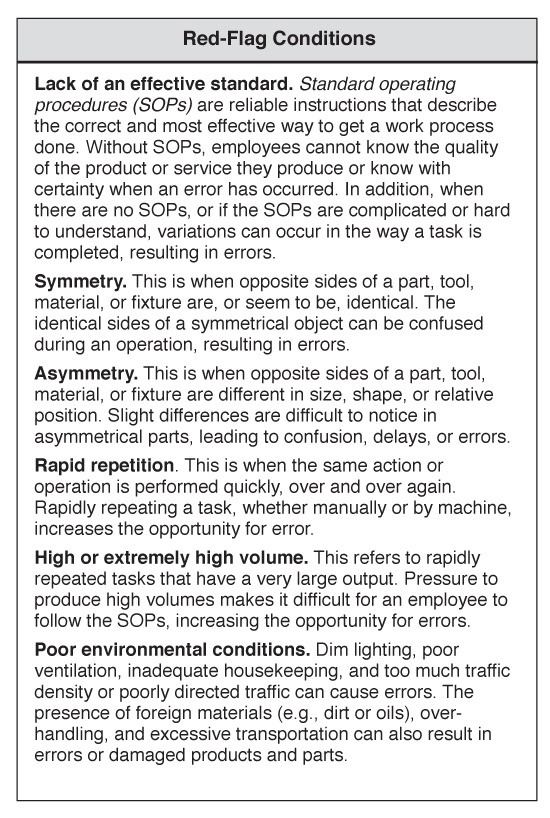
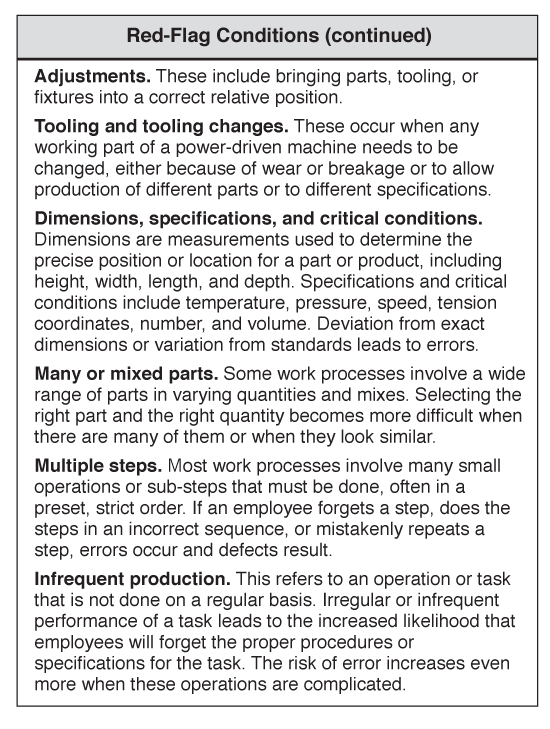

How do I error-proof my production process?
An effective way of error-proofing your work processes is to use the 7-Step Problem-Solving Model, a systematic model for solving problems. You use this model to identify errors, create solutions, and prevent the errors from happening again.
During this process, inspections are performed and error-proofing devices are installed during Step 4, which involves developing a solution and action plan.
Since all production processes are affected by product and machine design, work methods, employees’ skill levels, and supporting technology, you must consider these factors during your error-proofing activities. A snapshot of the 7-Step Model is shown below.
The 7-Step Problem-Solving Model
- Describe the problem
- Describe the current process
- Identify the root cause(s)
- Develop a solution and action plan
- Implement the solution
- Review and evaluate the results
- Reflect and act on learnings
(Note: An in-depth discussion of the 7-Step Problem-Solving Model is beyond the scope of this book. For a complete description, please refer to The Problem-Solving Memory Jogger®.)